Plums
6" x 6"
Oil on board
Saturday, October 27, 2012
Thursday, October 25, 2012
Tuesday, October 23, 2012
Sunday, October 21, 2012
Rivets and Rust
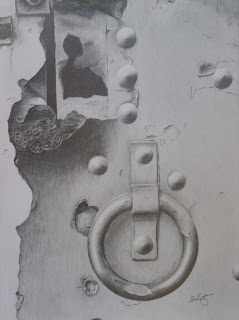
This is progression of a drawing I did of an old, rusty military battery door in Marin. I loved the decayed look of the metal and I thought the silvery effect of graphite would be perfect for it. However, I have a love/hate relationship with graphite when it comes to taking photographs of drawings. It is nearly impossible to avoid reflected light spots because of its shiny nature. So, please excuse the poor pictures. They were snapped on different cameras under different conditions, and sadly, these are better than the ones I chose not to post.

I started with a fairly hard pencil --6H--and roughed in a light sketch. I'm careful not to press too hard at this point so I don't indent the paper and ruin its tooth. The paper I'm using is from an Italian company who has been manufacturing paper since 1404. No, that date is not a typo. It is called Cartiera Magnani and Napoleon even used their paper for his wedding invitations. I really enjoy drawing on it. I started out using a half sheet.
I started rendering the drawing with a soft pencil--5B--in the upper left hand corner since I'm right handed and I don't want to be dragging my hand across any finished areas any more than necessary. So I try to work simultaneously downward and towards the right. The pencil hardness (or softness) is also for a reason. My drawing teacher at Gonzaga insisted we use 6B pencils to draw. Her reasoning was that if we used a soft pencil that was able to make a very dark mark without pressing too hard, we could also use lighter pressure to make lighter marks and by varying the pressure throughout the drawing, establish a full range of values without changing back and forth between 8-12 pencils. I've followed this advice for many years, with the exception of establishing my initial sketch. This time however, the stumps of all my 6B pencils were already only about an inch and a half long and I couldn't find my pencil extender so I used the next best thing, a 5B pencil.
After massing in some of the dark areas, I needed a change of pace and decided to establish a mid-tone on the area of the paper around the rivets. I used shavings from a woodless 5B graphite pencil and rubbed them in with a soft cloth, however, I don't recommend this. I lost a lot my initial sketch marks and it created far too much extra work for me. If I wanted to go this route, I should have toned that area prior to my light sketch. After I messed everything up by doing that, I had to try to recreate what marks I could make out and establish my sketch again. I also used a kneaded eraser to remove the mid-tone from the lightest areas of the rivets. From this point on, I had to put a clean piece of paper under my drawing hand and arm to prevent smudging.
The next step was to try and establish that the darkest area was, in fact, negative space. I had to detail the area around the rusted-out hole so that the hole would appear to be a hole and not something dark sitting on top of the metal. I also began work on some of the rivets and the cracks around them. Those cracks were just too much fun, in an art nerd sort of way.
Next, I tried to tightly render the rusty, peeling area on the left.
This area was extremely difficult and proved the most trying part of the
drawing.
I kept adding details and refining shapes. I started to show the shading near the middle of the page by making hundreds of small, overlapping strokes. I wanted to keep the painted part of the door on the far left as clean, white paper as much as possible and to represent it as negative space by drawing what was around it instead.
I wanted the small strokes to continue, but gradually lighten in tone at the soft edge of the shadow. At this point, the first resurrection of what marks I could still make out from my initial sketch of the ring were accomplished.
The drawing continued to the southeast, if you will. I began to finish the upper right corner and lower left corner of the drawing while establishing the top left part of the ring.
The finished drawing. The ring was completed and the aged markings both around the ring and on the ring itself were added. My signature was slapped on to make it final. I believe this was on the third day of drawing.
And here is a snapshot of the drawing with what was left of my 5B pencil in the end.
Subscribe to:
Posts (Atom)

.jpg)


